Order Settings
This setting contains some miscellaneous options controlling the behaviour of various aspects of the Sales Order screen.
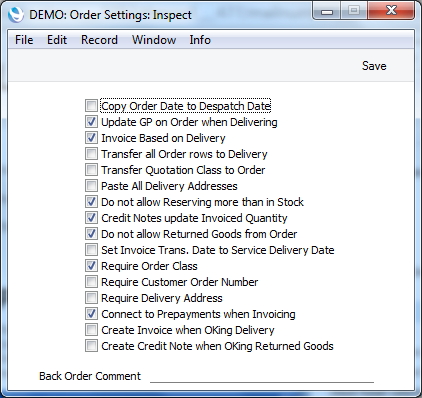
- Copy Order Date to Despatch Date
- When you create an Order, the current date will appear in the Order Date field, and the Despatch Date field will usually be blank. If you want the Despatch Date field to default to the current date as well, check this box. If you then change the Order Date, the Despatch Date will be changed as well.
- Update GP on Order when Delivering
- When you enter an Item in an Order, its Cost Price will be brought in to flip C of the Order row from the Item register. This Cost Price will be used to calculate the Gross Profit of the Order. When you deliver the Order, the actual cost of sales price (calculated using the Cost Model e.g. FIFO, LIFO or Weighted Average value) of the Item may not be the same as the figure in the Order. Use this option if you would like the unit cost of sales value from the Delivery to be copied back to the Order row when you approve the Delivery, so that the Gross Profit of the Order will be recalculated.
- Be careful using this option if you often make partial Deliveries from Order rows. The unit cost of sales value from the most recent Delivery will be copied back to the Order row, becoming the unit Cost Price for the entire quantity in that Order row and overwriting the figure that was previously there.
- If you are not using the Update GP at Invoicing option in the Cost Accounting setting in the Stock module, the Cost Price in each Order row will be copied to the corresponding Invoice row. So, if you are using this Update GP on Order when Delivering option but not the Update GP at Invoicing option, the unit cost of sales value of each Item will be copied from Orders to Invoices.
- Invoice Based on Delivery
- When you use an Item that requires Serial Numbers in an Order, you can use a single Order row with the correct Quantity. When you create the Delivery, it will contain the appropriate number of rows each with a Quantity of one, allowing you to enter Serial Numbers individually. On returning to the Order, only the Serial Number of the last Item will be visible.
- When the time comes to raise an Invoice from such an Order, the Invoice can mirror the Order (i.e. with a single row for the Serial Numbered Item with the Quantity from the Order) or it can mirror the Delivery (i.e. with a number of rows each with a Quantity of one). Check this box if you wish to use the latter option: this will be useful if you need to have the Serial Numbers printed on Invoices as well as on Delivery Notes.
- This option applies to Invoices created from Orders using the 'Create Invoice' function on the Operations menu and to Invoices created in batches using the 'Group Invoicing' and 'Invoice Delivered Orders' Maintenance functions.
- This option will also cause the Delivery Number(s) and the total value of the Items on each Delivery to be printed on separate lines on each Invoice.
- If you are using this option, you cannot also use the Credit Invoices Update Stock option in the Optional Features setting in the System module. The Credit Invoices Update Stock option will be treated as being off. To return Items to stock, you will need to create Returned Goods from Deliveries or Orders before issuing Credit Notes.
- If you are using this option, you cannot also use the Invoices before Delivery option in the Stock Settings setting. The Invoices before Delivery option will be treated as being off.
- Transfer all order rows to delivery
- Use this option if you want all items from the order to always be transferred whenever a delivery is created, even if some of the items form the order have already been delivered in full.
- Transfer Quotation Class to Order
- You can convert a Quotation into an Order by selecting 'Create Order' from the Operations menu of the Quotation window. Check this box if you would like the Quotation Class to be copied to the Order Class in the new Order automatically.
- Paste All Delivery Addresses
- The Delivery Addresses setting allows you to record Delivery Addresses for Customers that have several branches. You can choose the appropriate Delivery Address in Quotations, Orders and Invoices using the field on the 'Del Address' card and in Deliveries using the field on the 'Address' card. Usually, the 'Paste Special' list from these fields will only list Delivery Addresses for the Customer in question and those with no Customer specified. If you would like the 'Paste Special' list to contain all Delivery Addresses, check this box.
- Do not allow Reserving more than in Stock
- The Reserved check box in the Order header allows you to reserve stock for an Order. When you deliver similar Items in fulfilment of other Orders, HansaWorld Enterprise will maintain sufficient stock for the Order in question while it remains undelivered.
- If you are using this option, you will not be able to reserve stock for an Order if the Order Quantity of an Item is greater than the quantity you have in stock. When you try to save an Order in which you have attempted to do this, you will be told, "You cannot reserve more than is available in stock". This check will only be made for Stocked Items. If you want it to be made for Structured Items as well, use the Paste Components During Entry option in those Items ('Recipe' card).
- This option also applies to the Reserved box in the Stock Movement header.
- Credit Notes update Invoiced Quantity
- This option controls whether the Invoiced Quantity on flip D of an Order will be updated automatically when you credit an Invoice related to the Order.
- If you are using this option, the Invoiced Quantity figure will be updated automatically if you create the Credit Note by duplicating the original Invoice or using the 'Create Credit Note' Operations menu function from the original Invoice or from the Returned Goods screen. If you duplicate the original Invoice, the Invoiced Quantity figure will only be updated if you enter the appropriate Payment Term and the number of the Invoice to be credited before you save the Credit Note for the first time.
- If you are not using this option, you can update the Invoiced Quantity on flip D of an Order using the 'Recalculate Orders' Maintenance function.
- If you create the Credit Note by entering a new record to the Invoice register, the Invoiced Quantity figure in the originating Order will not be updated, irrespective of whether you are using this option, and it will not be updated by the 'Recalculate Orders' function.
- If the Invoice you are crediting was created using the 'Group Invoicing' Maintenance function, the Invoiced Quantity in the relevant Orders will not be updated irrespective of whether you are using this option.
- Do not allow Return Goods from Order
- If goods that you have delivered to your Customer are returned to you, you can create a Returned Goods record from the Sales Order or from the Delivery. You must create Returns from Deliveries if you are using the Original Cost on Returned Goods option in the Cost Accounting setting in the Stock module and/or you are using the option to insert Returned Goods at their original position in the FIFO/LIFO cost queue in the same setting. Check this box if for some other reason (e.g. to maintain a true weighted average) you want to make sure that Returned Goods are always created from Deliveries.
- Set Invoice Trans. Date to Service Delivery Date
- The Service Delivery Date is the date the Items on an Order were delivered. When you create an Invoice from an Order, the date of the latest approved Delivery will appear in the Service Delivery Date field on the 'Delivery' card of the Invoice. If you are using this option, the date of the latest approved Delivery will be used as the Invoice Transaction Date as well. This may result in the Invoice Date and the Invoice Transaction Date being different, so you should not use this option in countries where these dates have to be the same.
- Require Order Class
- Use this option if you want every Order to be assigned to an Order Class.
- Require Customer Order Number
- Use this option if in your business it is mandatory to have a Purchase Order number from the customer which you need to include in your Sales Order
- Connect to Prepayments when Invoicing
- It is possible that at times a Sales Order will be prepaid in full or partially by the customer. In such cases when an invoice is created from Sales Order operations menu, you can automatically have the prepayment connected to the final invoice. This setting enables you to automatically connect the prepayment to the final invoice.
- Create Invoice when OKing Delivery
- Use this option if you want that when the Delivery is OKed and Saved, the Sales Invoice should automatically be created.
- Create Credit Note when OKing Returned Goods
- Use this option if you Credit Note Invoice to be automatically generated when the Returned Goods is Oked and Saved.
- Back Order Comment
- When you create a Delivery from an Order, the Comment from the 'Del. Terms' card of the Order will be copied to the Comment in the footer of the 'Items' card of the Delivery. In the case of partial Deliveries, the same Comment will therefore appear on every Delivery created from a particular Order. However, if you enter a Back Order Comment here, this Back Order Comment will appear on the second and subsequent Deliveries.
|