Stocktaking Comparison
The 'Stocktaking Comparison' function automates the last stage of the stocktaking process. It compares the Counted quantities in the Stocktaking record(s) for a specified date with the stock levels in the same record or stored in your Standard ERP database. If there are any discrepancies between the Counted quantities and stock levels, the function will create appropriate Stock Depreciation transactions and Goods Receipts. If you have more than one Location, you should run this function separately for each Location. Before doing so, you can print a Stocktaking Comparison report if you need to see a list of the discrepancies that will be corrected.
Note that if your stocktake revealed that a particular Item was in a different Location to that in which it is recorded as being stored, you would probably choose to make the correction using a Stock Movement. If you use this function, the Item will be removed from the original Location using a Stock Depreciation transaction and moved in to the new one using a Goods Receipt.
In any Goods Receipts created by the function, the Unit Prices will be taken from the Cost Price fields on the 'Costs' card of the Item records. Since the new Goods Receipts will not be marked as OK (unless you so choose), you will be able to change these figures if necessary. The Purchase Accruals Account on flip E of these Goods Receipts (the Account that will be credited in the subsequent Nominal Ledger Transactions) will not be chosen in the usual manner. If the Type of the Location is "Other", the default will be the Stock Gain Account from the Account Usage Stock setting. If the Type of the Location is "Production", if the Item belongs to an Item Group and if you are using the Use Item Groups for Cost Accounts option in the Cost Accounting setting, the default will be the Usage Variance Account in the Item Group. Otherwise, it will be the Stock Gain Account in the Account Usage Stock setting. You can change this default before marking a Goods Receipt as OK.
In any Stock Depreciations created by the function, the Cost Account in the header will be the Stock Loss Account from the Account Usage Stock setting as normal. However, if the Type of the Location is "Production", if the Item belongs to an Item Group and if you are using the Use Item Groups for Cost Accounts option in the Cost Accounting setting, the Usage Variance Account in the Item Group will be copied to the Cost Account field on flip A of the Stock Depreciation row. In effect, this Account will be used for wastage resulting from the Production process. If these conditions are not all met, the Cost Account field in the Stock Depreciation row will be left empty.
This description uses the following terminology:
- Stocktaking record
- To be used by the 'Stocktaking Comparison' Maintenance function, a Stocktaking record must have been marked as OK. All references to Stocktaking records on this page therefore are to Stocktaking records that have been marked as OK.
- Counted quantity
- The Counted quantity is the number of units of an Item that you counted when you carried out the stocktake. In other words, it is the number of units in physical stock in your warehouse.
- In stock, Stock level
- The quantity in stock is the number of units that are recorded as being in stock in your Standard ERP database.
- Discrepancy, Adjustment Quantity
- The discrepancy or Adjustment Quantity is the difference between the Counted quantity and the quantity in stock. If the discrepancy/Adjustment Quantity for an Item is zero, the 'Stocktaking Comparison' function will take no action. If the discrepancy is positive, it will create a Goods Receipt for the Item to bring the quantity in stock up to the Counted quantity. If the discrepancy is negative, it will create a Stock Depreciation to bring the quantity in stock down to the Counted quantity.
Selecting the 'Stocktaking Comparison' function brings up the following dialogue box:
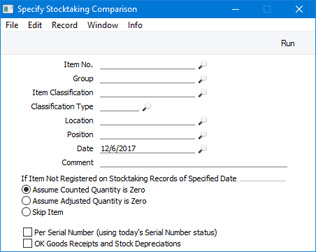
- Item No.
- Paste Special
Item register
- Range Reporting Alpha
- Enter an Item Number (or range of numbers) if the function is only to compare stock levels and Counted quantities of specific Item(s). Use a colon (:) to separate the first and last numbers in the range.
- This comparison will only be made for Stocked Items in the range (not Plain, Service or Structured Items).
- Group
- Paste Special
Item Group register, Sales Ledger
- Range Reporting Alpha
- Enter an Item Group Code if the function is to compare stock levels and Counted quantities of the Stocked Items that belong to a particular Item Group. You can also enter a range of Item Groups, but as the field will only accept five characters you may need to enter an alphabetical range (e.g. "A:M").
- Item Classification
- Paste Special
Item Classifications setting, Sales Ledger
- Enter a Classification Code in this field if you want the function to compare stock levels and Counted quantities of Items with a certain Classification. If you leave the field empty, every Item, with and without Classification, will be subject to the comparison. If you enter a number of Classifications separated by commas, the comparison will only be carried out for those Items featuring all the Classifications listed. If you enter a number of Classifications separated by plus signs (+), the comparison will be carried out for every Item featuring at least one of the Classifications listed. If you enter a Classification preceded by an exclamation mark (!),the comparison will be carried out for every Item featuring any Classification except the one listed.
- For example:
- 1,2
- Compares stock levels and Counted quantities for Items with Classifications 1 and 2 (including Items with Classifications 1, 2 and 3).
- 1+2
- Compares stock levels and Counted quantities for Items with Classifications 1 or 2.
- !2
- Compares stock levels and Counted quantities for all Items except those with Classification 2.
- 1,!2
- Compares stock levels and Counted quantities for Items with Classification 1 but not those with Classification 2 (i.e. not Items with Classifications 1 and 2). Note the comma before the exclamation mark in this example.
- !1,!2
- Compares stock levels and Counted quantities for all Items except those with Classification 1 or 2 or both. Again, note the comma.
- !(1,2)
- Compares stock levels and Counted quantities for all Items except those with Classifications 1 and 2 (i.e. not Items with Classifications 1, 2 and 3).
- !1+2
- Compares stock levels and Counted quantities for Items without Classification 1 and those with Classification 2 (i.e. including Items with Classifications 1 and 2).
- (1,2)+(3,4)
- Compares stock levels and Counted quantities for Items with Classifications 1 and 2, and those with Classifications 3 and 4.
- 1*
- Compares stock levels and Counted quantities for Items with Classifications beginning with 1 (e.g. 1, 10, 100).
- 1*,!1
- Compares stock levels and Counted quantities for Items with Classifications beginning with 1 but not 1 itself.
- *1
- Compares stock levels and Counted quantities for Items with Classifications ending with 1 (e.g. 1, 01, 001).
- 1*,*1
- Compares stock levels and Counted quantities for Items with Classifications beginning and ending with 1.
- Classification Type
- Paste Special
Classification Types setting, CRM module
- Enter a Classification Type in this field if you want the function to compare the stock levels and Counted quantities of every Item with a Classification belonging to that Type. If the field is empty, stock levels and Counted quantities will be compared for every Item, with and without Classification. If you enter a number of Classification Types separated by commas, stock levels and Counted quantities will be compared for Items featuring a Classification belonging to any of those Types.
- Location
- Paste Special
Locations setting, Stock module
- To compare stock levels and Counted quantities of Stocked Items in one stock Location, specify that Location here. The comparison will be based on Stocktaking records with this Location specified in the header, and on Stocktaking rows in which this Location has been specified.
- If you have more than one Location, you must make an entry to this field and run this function separately for each Location.
- If you have a single Location, you will have specified in the Stock Settings setting that this Location is your Main Location. In this case, you will not need to specify that Location here.
- This Location will be copied to any Stock Depreciation transactions and Goods Receipts created by the function. Any Tags/Objects specified in the Location will also be copied to those Goods Receipts and Stock Depreciations. These Tags/Objects will not be copied to other Goods Receipts and Stock Depreciations, so they will allow you to analyse in the Nominal Ledger stock gains and losses for each Location resulting from the stock checking process.
- If you specify a Location in which you have selected the Require Position option, the comparison will be carried out at the Position level. For example, if you have counted an extra unit of an Item in a particular Position, that Position will be copied to flip F of the resulting Goods Receipt row.
- Date
- Paste Special
Choose date
- Specify the date for which the Stocktaking comparison is to be carried out. If there is a Stocktaking record with the specified date, the function will compare the stock levels and the Counted quantities in that Stocktaking record and will create a Goods Receipt and/or a Stock Depreciation record for any discrepancies between those figures. If you do not enter a date here, the Stocktaking record for the current date will be used.
- If you created the Stocktaking record with the specified date using the 'Create Stocktaking Records' Maintenance function, the In Stock column in the matrix will contain the stock level of each Item as it was at the moment when the record was created. The function will take both the stock level and the Counted quantity of each Item from the Stocktaking record. If you created the Stocktaking record by entering it yourself, the In Stock column in the matrix will be empty. In this case, stock levels for the specified date will be calculated when you run the function and only the Counted quantity will be taken from the Stocktaking record.
- If you specify a date for which no Stocktaking record exists, the first record after the specified date will be used. Please refer to the 'Example' section in the description of the Stocktaking Comparison report for more details about this point. If there is no Stocktaking record later than the specified date, all Counted quantities will be zero. Stock figures will not be zero because they will be calculated for the specified date as mentioned at the end of the previous paragraph. This will mean that the discrepancies between the stock levels and Counted quantities will not be correct. If you select the Assume Counted Quantity is zero option below, the function will then create a Stock Depreciation record containing the entire stock for the specified Location.
- If you specify a date for which more than one Stocktaking record exists, Counted quantities will be taken from all Stocktaking records with that date (they will added together if you have used the same Item in more than one Stocktaking record).
- You should not specify a future date.
- The Date entered here will be copied to any Stock Depreciation transactions and Goods Receipts created by the function.
- As historic stock levels are maintained for most Items, you can compare stock levels for a past date with the Counted quantities in the Stocktaking record(s) with the same date, even if the In Stock column in the Stocktaking record(s) is empty. The exception is for Serial Numbered Items. Historic stock levels (i.e. quantities in stock) are maintained, but the Serial Numbers themselves are not. So, if you select the Per Serial Number option below, the function will compare the Counted quantities in the Stocktaking record(s) with the date specified here with current Serial Numbers. Therefore, if you need to use the Per Serial Number option, you should enter the current date here and you should have a Stocktaking record with the current date that includes the Serial Numbered Items. If you enter a past date, it should be a date since when there has been no change in the Serial Numbers held in stock. If, for example, you have delivered a Serial Numbered Item after the last Stocktaking record, the Counted quantity in the Stocktaking record, although accurate for the date, will be one greater than the actual (current) stock level, and so a Goods Receipt will incorrectly be created for that discrepancy.
- Comment
- If you enter a comment here, it will be copied to every Stock Depreciation transaction and Goods Receipt created by the function.
- If Item Not Registered on Stocktaking Records of Specified Date
- The function will compare stock levels and Counted quantities for any Stocked Item that meets the criteria specified above and that satisfies any of the following requirements:
- It is included in at least one Stocktaking record(s) for the specified date.
- It is included in a Stocktaking record that is later than the specified date. Please refer to the 'Example' section in the description of the Stocktaking Comparison report for more details about this point.
- It is not included in any Stocktaking records for the specified date or later, but it is recorded in your database as being in stock on the specified date.
Select one of these options to specify how the function should treat an Item that it will only consider because it satisfies point (3) above.
- Assume Counted Quantity is zero
- If you select this option, the Counted quantity of an Item that is in stock in your database but not listed in the Stocktaking records will be assumed to be zero. In other words, this option assumes that the reason you didn't enter the Item in a Stocktaking record was because you counted no units during the stocktake. The function will therefore will create a Stock Depreciation, to write off the units that are in stock in your database.
- Use this option if you have carried out a complete stocktake (not a partial one).
- Assume Adjusted Quantity is zero
- If you select this option, it will be assumed that an Item that is not listed in the Stocktaking records has no discrepancy, so no adjustment is needed (i.e. the function will not create a Stock Depreciation or a Goods Receipt).
- You might use this option in the situation where you have not finished with the stocktaking process, so you do not want Stock Depreciation records or Goods Receipts created for Items that you have not counted yet.
- Skip Item
- This is similar to the second option described above.
- Per Serial Number (using today's Serial Number status)
- If the function includes a Serial Numbered Item in a new Goods Receipt or Stock Depreciation, it will usually be in a single row with appropriate Quantity, and without Serial Numbers. Before marking the new transaction as OK, you will need to specify the correct Serial Numbers yourself, inserting the appropriate number of rows with appropriate Quantity (if the Item is Serial Numbered at the Batch level), or each with a Quantity of one (if the Item is Serial Numbered at the Unit level). If you would like this function to suggest Serial Numbers and Quantities, select this option.
- If you are using this option, it is recommended that you enter the current date in the field above, and that you have at least one Stocktaking record with the current date that includes the Serial Numbered Items.
- OK Goods Receipts and Stock Depreciations
- Select this option if you would like the Goods Receipts and Stock Depreciation records created by the function to be marked as OK immediately.
- You can use Access Groups to prevent certain users from marking Goods Receipts and Stock Depreciations as OK. To do this, deny them access to the 'OK Goods Receipts' and 'OK Stock Depreciation' Actions. If the Person running this Maintenance routine selects this option but has been denied access to these Actions, the new Goods Receipts and Stock Depreciations will not be marked as OK.
- If the function includes a Serial Numbered Item in a new Goods Receipt or Stock Depreciation but does not specify a Serial Number (usually this will be if you are not using the Per Serial Number option above), then the transaction will not be marked as OK because this is not possible until you have specified the Serial Number.
Please refer to the description of the Stocktaking Comparison report for an example.
---
Maintenance functions in the Stock module:
Go back to:
|