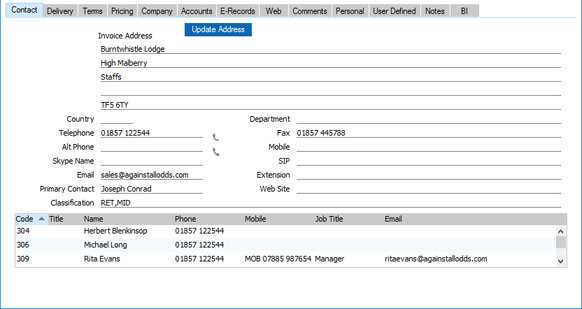
Entering a Contact - Contact Card
This page describes the fields on the 'Contact' card of the Contact record. Please follow the links below for descriptions of the other cards:
---
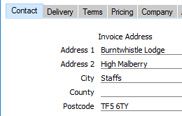
- Inv. Address
- Used as default in
Sales and Purchase Orders, Sales Invoices
- Enter here the address to which Sales Invoices, statements, Purchase Orders and Payments are to be sent.
- If you want to give a name to each of the individual address lines, use the 'Address' card of the User Defined Fields - Contacts setting in the CRM module. This can be useful if, for example, you want to indicate that the town or city is always to be typed into the third line of the address:
The address line names that you specify in the User Defined Fields - Contacts setting will be used for this Invoice Address, for the Delivery Address on the 'Delivery' card and for the addresses in other records (e.g. in Quotations, Orders and Invoices).
- In the UK, it is recommended that you use the fifth line of the address for the postcode. This will enable you to use the "Update Address" feature (described immediately below) and also the [Map] button in the 'Communication Centre' window.
- If you will be using Standard ERP to control the processing of credit and debit card payments and if your credit card provider will check that card holders' addresses are correct, use the fifth line of the address for postcodes (UK) or the fourth line of the address for the two-character state code (US). This will ensure the card holders' postcodes/state codes will be sent to the provider correctly. Please refer to the Processing credit and debit card payments through Standard ERP page for more details about credit card payments.
- Update Address
- In the UK, you can use this button to obtain the Contact's address from a central postcode database. Enter the Contact's postcode (with or without space) on the fifth line of the Invoice Address and then press this button. The street name will be placed in the first line of the address and other address details will be brought in as appropriate. A list of premises will also be opened, where you can select the correct building number, building name or company name by double-clicking. The company name will be copied to the Name field above if this is empty, and the building number or name (if any) will be incorporated into the first line of the address.
- Similarly, in Estonia, Latvia, Lithuania, Norway and Sweden you can obtain the Contact's Invoice Address from a central Company Registration Number database. Enter the Contact's Company Registration Number on the 'Company' card (in the Reg. No. 1 or the Reg. No. 2 field, with priority being given to Reg. No. 2) and then press this button (a duplicate button is provided on the 'Company' card so you can press the button immediately after entering the Reg. No. 1 or Reg. No. 2). The Company Name, Invoice Address and other information depending on the country will be brought in to the appropriate fields. In Estonia, Latvia and Lithuania, the Company Registration Number will be placed in the Reg. No. 1 field if it was previously in Reg. No. 2.
- Address Lookup is a chargeable Cloud Service. To use it, you must have registered your database in Estonia, Latvia, Lithuania, Norway, Sweden or the UK using the Automatic Internet Enabler method, as described on the Enabler Key page. Depending on where your database is registered, you may be able to start using the Address Lookup service straight away using the default pricing scheme. Please contact your local HansaWorld representative for more details.
- If you are in Canada or the US and have registered an Avalara account in your Standard ERP database, you can use the [Update Address] button after entering an Invoice Address to check that the address is correct. If it is correct, the characters will be converted to uppercase, but if the address is not correct or is not recognised by Avalara, the characters will be left as they are.
- Country
- Paste Special
Countries setting, System module
- Enter the Country in which the Contact is located.
- When you specify a Country, the VAT Zone, Freight Code, Price List, Discount Matrix and Sales Tags/Objects will be brought in from the relevant record in the Countries setting.
- If you enter a VAT Registration Number on the 'Company' card, an automatic validation check will be made that it is in the correct format for the Country. This validation check requires you to have defined VAT Number formats for each Country in the VAT Reg. Number Masks setting in the System module.
- If you are in the UK and you will be using Standard ERP to control the processing of credit and debit card payments and if your credit card provider will check that card holders' addresses are correct, you must enter "GB" in this field. Providers expect "GB" and do not recognise "UK". Please refer to the Processing credit and debit card payments through Standard ERP page for more details about credit card payments.
- Also in the UK, if you need to use the 'Intrastat Invoices (UK)' and 'Intrastat Purchase Invoices (UK)' Export functions in the Sales and Purchase Ledgers, you should specify Countries in the Contact records for every Customer and Supplier. In the case of domestic Customers and Suppliers (i.e. Customers and Suppliers in the UK), enter "GB": do not leave the field empty. The Intrastat Export functions will use this Country when determining whether to include an Invoice in the Intrastat export file, and will also include it in the export file as the country to which the goods on an Invoice were exported or from where they were imported. HM Revenue and Customs require you to use two-character ISO Country Codes: you can find a list in their Notice 60 document, available from https://www.uktradeinfo.com/Intrastat/IntrastatServices/Pages/Notice60.aspx.
- Department
- You can record the name of a Department here. This might be necessary if you are dealing with several Departments in the same company.
- Alternatively, if your company has several departments, you can specify the one responsible for relations with this company here.
- You can sort the Customer List report by Department.
- Telephone, Fax, Alt Phone, Mobile, Skype Name, SIP, Email, Extension
- Enter the Contact's main telephone, mobile and fax numbers, email and SIP addresses and Skype name in these fields. Use the Alt Phone field to record an alternative contact number such as home telephone or personal fax number.
- If you are using the Standard ERP Fax Server, the fax number will be used when faxing documents to the Contact. The Fax Server will not send faxes to numbers containing spaces, dashes or other non-numeric characters, so do not use these characters. You can use the 'Update Fax Numbers' Maintenance function in the Technics module to remove illegal characters from the Fax Numbers in Contact records.
- The email address will be used when you need to send Mails to the company, and when you need to send Customer Letters by email. If you do not want email addresses to be printed in the Birthday List, Contact List, Lead List, Resource Info and Unconfirmed Reservations reports or exported by the Contact List, Contact List to Palm3 and Contact Relations List export functions, select the Exclude All Contact emails from Reports option in the Mail and Conference Settings setting in the Email and Conferences module. If you need email addresses to be unique (i.e. you want to be prevented from using the same email address in more than one Contact record), select the Email option on the 'Registration' card in the My Account Settings setting in the Webshop and CMS module.
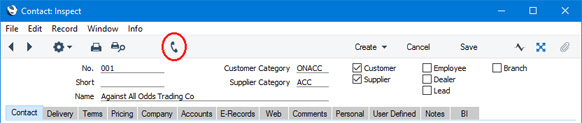
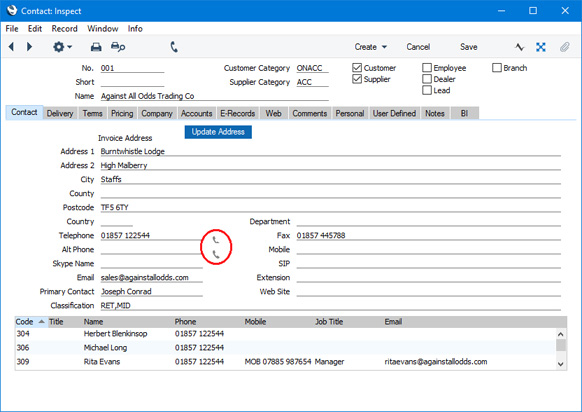
- If you need to call the Contact, click or tap the [Communicate] button in the Button Bar:
The 'Communication Centre' window opens, showing the Contact's contact details in the area on the right:
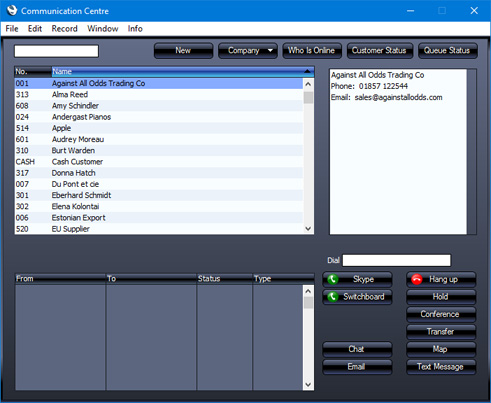
Subject to your computer or network having the suitable connection software and hardware and to your database being configured correctly, click on a contact method in the list, and then click the appropriate button. For more details, please refer here. If you will use the 'Communication Centre' window to communicate with the Contact using methods such as SkypeOut and Asterisk, the Contact's telephone and mobile numbers can only contain numbers, spaces, dashes and the + sign. They must not contain other characters such as full stops, brackets or any alpha characters. You can use the List Invalid Phone Numbers report in the CRM module to check for illegal characters in the Telephone, Alt Phone, Fax and Mobile fields in each Contact.
- You can also click or tap the telephone buttons in the individual fields:
If you have chosen a Preferred Call Method in the Local Machine setting in the User Settings module ('Integrations' card), a call will be initiated using that calling method to the number in the field whose telephone button you used. If you have not chosen a Preferred Call Method or your database has not been configured correctly for the selected Preferred Call Method, the 'Communication Centre' window will be opened. The Local Machine setting is specific to the machine you are using, so there can be different Preferred Call Methods on different machines.
- Primary Contact
- Paste Special
Contact Persons in Contact register
- If a Contact is a company or organisation (i.e. not an individual person), use this field to record the name of your most important Contact Person in that company or organisation.
If you need to connect the company or organisation to other Contact Persons, use the 'Linked Contact Person' function on the Create menu (if a Contact Person does not yet have their own record in the Contact register) or the 'Link Existing Contact' function on the Operations menu (if a Contact Person already has their own record in the Contact register).
- When you use the Contact record for the company or organisation in any transaction, the Primary Contact will be copied to that transaction as a default. For example, if you specify the company or organisation in a Sales Invoice as the Customer, its Primary Contact will be copied to the Attention field in that Invoice. You can of course change to another Contact Person in that Attention field. The 'Paste Special' list from that field will only contain Contact Persons that work for the Customer.
- If you will be sending documents by email to the company or organisation and you need to specify that particular documents will be sent to particular Contact Persons (e.g. that Invoices should be sent to one Contact Person and that statements should be sent to another Contact Person), use the Additional Email Recipients setting in the CRM module to set this up.
- Please refer to the Linking Contacts and Companies page for more details about connecting a company or organisation to its Contact Persons.
- Web Site
- If the Contact has a website, enter its address (URL) here.
- Classification
- Paste Special
Contact Classifications setting, CRM module
- Together with Customer and Supplier Categories, you can use Contact Classifications to group Contacts of a similar type together. You can use the Classification as a reporting and mailing criterion in the CRM module and in the Sales Ledger. You can assign several Classifications to each Contact record, separated by commas.
- If you have assigned a Contact to a Customer Category in which you have specified some Classification Types, you must enter Classifications belonging to each of those Types in this field before you can save the Contact.
- Two Maintenance functions, 'Add Classification to Contacts' in the CRM module and 'Update Customer Classification' in the Sales Ledger, allow you to assign Classifications to Contacts based on various criteria such as the Items they have bought or not bought.
- In Argentina, you should enter a Classification representing the Customer type in each Contact record representing a Customer. When you issue an Invoice to a Customer, the selection of Official No. in that Invoice will depend on the Customer type. If a Customer is registered with the tax authority as a company, their Invoices should be given "A"-type Official Numbers. Invoices issued to end users or private individuals should be given "B"-type Official Numbers, while Invoices issued to Customers abroad should be given "E"-type Official Numbers. When you define number sequences for Official Numbers (using the Legal Record Numbers setting in the Sales Ledger), you should define sequences for "A", "B" and "E" Customers, separating them by specifying "A", "B" and "E" Classifications on flip B. After assigning the relevant Classification to each Customer, this connection will enable an Official Number of the correct type to be assigned to each Invoice, depending on the type of Customer. Usually you will also need to specify the Customer type in the Language field (on the 'Company' card), to ensure that Invoices for Customers of a particular type are printed using the correct Form Template.
At the bottom of the 'Contact' card, there is a grid. If the Contact is a Customer or Supplier, this grid will list the Contact Persons working for them. Please refer to the Linking Contact Persons and Companies - The Contact Relations Register page for full details.
---
The Contact register in Standard ERP:
Go back to:
|