|
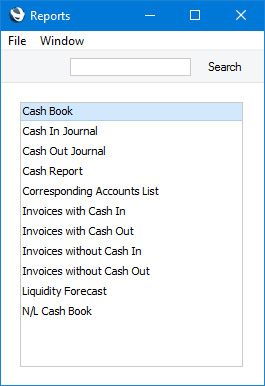
Search HansaManuals.com HansaManuals Home >> Standard ERP >> Cash Book >> Reports Previous Next Entire Chapter in Printable Form Search This text refers to program version 8.5 Introduction to Reports in the Cash Book Module As with all modules, to print a report in the Cash Book module, click (Windows/macOS) or tap (iOS/Android) the [Reports] button in the Navigation Centre or use the Ctrl-R (Windows)/⌘-R (macOS) key combination. The 'Reports' window will open, listing the reports that are available in the Production module:
It is often possible to report on a selection range, such as a range of Cash In or Cash Out Numbers. To do this, enter the lowest and highest values of the range, separated by a colon. For example, to report on Cash in transactions 001 to 010, enter "001:010" in the Cash In Number field. Depending on the field, the sort used might be alpha or numeric. In the case of an alpha sort, a range of 1:2 would also include 100, 10109, etc. Use the Media options at the bottom of the specification window to determine the print destination of the report. The default is to print to screen. You can initially print to screen and subsequently send the report to a printer by clicking the Printer icon at the top of the report window (Windows/macOS) or by selecting 'Recalculate and Print' from the Operations menu. If you are using iOS or Android, you will find this function on the Tools menu (with 'wrench' icon). Once you have entered the reporting criteria and have chosen a print destination, click or tap [Run]. If you print a report to screen, you can use the 'Recalculate' command on the Operations menu in the report window to update the report after making alterations to background data. The 'Reopen Report Specification' command on the same menu allows you to produce a new report using different reporting criteria. If you are using iOS or Android, the 'Recalculate' function will be on the Tools menu. There will be no 'Reopen Report Specification' command: tap < to go back to the specification window instead. Please follow the links below for details about the reports in the Cash Book module:
Go back to:
Previous Next Top Entire Chapter in Printable Form |