Introduction to the Invoice Register
The Invoice register is a record of your company's sales. Each time you make a sale, you should enter an Invoice, print it and send it to the Customer. You will therefore use the Invoice register for a number of tasks:
- The printed Invoice sent to the Customer acts as a demand for payment;
- Unpaid Invoices in the register provide the basis for your debt chasing reports; and
- Each Invoice can cause a Nominal Ledger Transaction to be created, thus generating the turnover and debtor figures in your monthly and yearly management reports. If required, the Nominal Ledger Transaction can also include a cost accounting element, helping to maintain a stock valuation in the Nominal Ledger. This creation process is automatic, requiring no intervention or work from you.
The following types of sales transaction can be recorded in the Invoice register:
- Standard Invoices, or demands for payment, are issued where the goods have been delivered or work carried out before payment has been received. Payments against such Invoices should be recorded in the Receipt register.
- The Cash Note is issued when you receive payment at the same time as carrying out the work. When a Cash Note is entered to the Invoice register, FirstOffice will treat it as having being paid, so there is no need to enter a separate payment record in the Receipt register. FirstOffice can also look after the Nominal Ledger implications for you (debiting the Cash Account rather than the Debtor Account).
- A Deposit is a payment made in advance of the goods being delivered or the work being carried out. Invoices for deposits (sometimes described as "Down Payment Invoices') can be entered in manner described in point (1) above. Where the payment is received before an Invoice has been raised, this should be recorded in the Receipt register as a Prepayment Receipt. These can be allocated to the Invoice when it is generated at a later date. Alternatively, they can be entered as Cash Notes as described in point (2) above.
- Credit Notes are used to correct mistakes in Invoices, or to cancel Invoices that have been raised in error. They are, in effect, negative Invoices that reduce your turnover and debtor figures. Again, FirstOffice can look after these Nominal Ledger implications automatically.
If you would like FirstOffice to look after the Nominal Ledger implications of all these types of Invoice as described, switch on the Invoice option in the
Sub Systems setting in the Nominal Ledger.
You can enter records to the Invoice register using the following methods:
- You can enter them directly to the Invoice register. This method is suitable for all the types of sales transaction mentioned above.
- You can create them remotely from the Sales Order register. This method can only be used for standard Invoices; Down Payment Invoices can be created remotely from Receipts.
Before you start entering Invoices, you must define the current financial (accounting) year, using the
Fiscal Years setting in the System module. You should also have defined a journal number series for Invoices using the
Number Series - Invoices setting.
To open the Invoice register, first ensure you are in the Sales Ledger module, then click the [Invoices] button in the Master Control panel. The 'Invoices: Browse' window is opened, showing Invoices already entered.
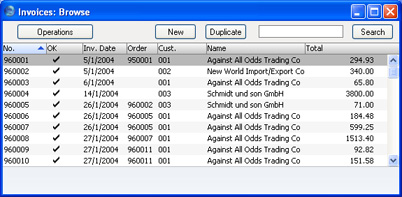
Invoices are numbered consecutively and the Invoice Number is usually generated by the system. The Invoice Number is followed by a check mark (if the Invoice is approved), by the Customer Number and Name and the total amount of the Invoice. Credit Notes have the letter "C" (or "K" in the case of some older Credit Notes) in the Total column, after the amount, while Interest Invoices are marked with an "I".
As in all browse windows you can change the sort order by clicking on the column headings. To reverse any sort, simply click once again on the column heading. You can also scroll the list with the scroll bars. Finally, you can search for a record by entering a keyword in the field in the top right-hand corner. FirstOffice will search for the first record matching the keyword in the same column as the selected sorting order.
There are three things you can do in the Invoice register: