|
Search HansaManuals.com HansaManuals Home >> Standard ERP >> System >> Form Template Register Previous Next Entire Chapter in Printable Form Search This text refers to program version 8.3 Introduction to the Form Template Register You can print many documents from Standard ERP, including Invoices, Orders, Quotations and Customer Labels.Each separate document that you can print consists of two elements, the "Form" and the "Form Template". The Form element extracts the relevant information from the database and places it in printable fields, while the Form Template is the graphic layout design of the printed output i.e. it controls where on the page each printable field will be placed (and it can contain other design elements such as lines and frames as well). The Form Template element in each document can be unique, allowing each document to have its own design. Usually, Invoices, Orders and Quotations will have similar (but not identical) designs, while Customer Labels will have a different design. A file containing samples of each Form Template is supplied with Standard ERP. The name of this file will vary depending on your location: in UK versions of Standard ERP, the file will be named "UKForms.txt". If you want to use these samples as the basis for your own designs, import this file as described on the Importing Set-up Data page. To design a new Form Template or to edit an existing one, use the Form Template register in the System module. The Form Template window contains a graphical editor that you can use to design each Form Template. You can only use this editor using Windows or Mac OS X. To open the editor, ensure you are in the System module and click the [Registers] button in the Navigation Centre and double-click 'Form Templates' in the resulting list. The 'Form Templates: Browse' window opens, showing the Form Templates that are already in the system:
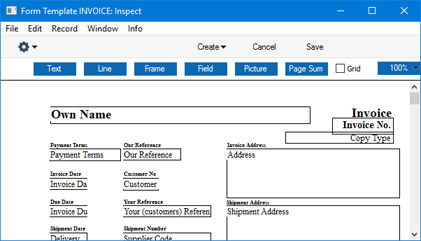
As the Form Template window is entirely occupied by the graphical editor, it does not contain any fields that you can use to set the specifications of a Form Template. These fields are in a separate window, the 'Properties' window, which you can open by selecting 'Properties' from the Operations menu. When you create a new Form Template, you must open the 'Properties' window to assign it a Code and Name before you can save it for the first time. When you have designed the Form Template and assigned it a Code and Name in the 'Properties' window, click the [Save] button in the Button Bar to save it in the normal way. After saving a new Form Template, you should connect it to a form. As described at the top of this page, each document that you can print consists of two elements, the "Form" and the "Form Template". Connecting the Form Template to the form will ensure that the form will be printed using the correct layout. Please refer to the Printing Forms page for details. --- Please refer to the following pages for more information about designing Form Templates:
Previous Next Top Entire Chapter in Printable Form |