Entering an Activity or Task
You can enter Activities and Tasks in many ways. If the Task Type in the new Activity is To Do, you will be able to find the Activity in the
Task Manager after saving. If the Task Type is Calendar, the Activity will be placed in the
Calendar.
- From the Task Manager, click the [New Task] button (Windows/Mac OS X) or tap the + button (iOS/Android) in the top right-hand corner. The Task Type of the new Activity will be To Do, and the Symbol will be Other. The Start Date and Start Time in the new Activity will be the current date and time.
- From any Calendar view, click the [New Activity] button or tap the + button in the top right-hand corner. You can also use the Ctrl-N (Windows) or ⌘-N (Mac OS X) keyboard shortcut. The Task Type of the new Activity will be Calendar, and the Symbol will be Other. The Start Date and Start Time in the new Activity will be the current date and time.
- Having printed the Personal Calendar report to screen, click or tap the [New Activity] text link at the top of the report. The Task Type of the new Activity will be Calendar, and the Symbol will be Other. The Start Date and Start Time of the new record will show the current date and time.
- From the Workflow Overview click the [New Activity] button in the top right-hand corner. The Task Type of the new Activity will be To Do, and the Symbol will be Other. The Start Date and Start Time in the new Activity will be the current date and time. If there are any columns in the Workflow Overview displaying Activities, the Activity Type will be taken from the first of those columns. Otherwise, the Activity Type will be blank. This option is not available on iOS or Android.
- When viewing an existing Activity, select 'New' or 'Duplicate' from the Create menu (Windows/Mac OS X) or + menu (iOS/Android). You can also use the Ctrl-N or Ctrl-K (Windows) or ⌘-N or ⌘-Y (Mac OS X) keyboard shortcuts. In the case of the duplicate, the Start Date will be copied from the original Activity, but the End Date will be made blank.
- Having printed the Customer Status or Supplier Status report to screen, click or tap the [New Activity] text link at the top of the report. The Task Type of the new Activity will be To Do, and the Symbol will be Other. The Start Date and Start Time in the new Activity will be the current date and time.
If the [New Activity] text link is missing from the Customer Status report, the probable causes are:
- You produced the Customer Status report from the 'Reports' list in the Sales Ledger or CRM modules. For the [New Activity] text link to be included in the report, produce it by opening the Contact record for a Customer and choosing Customer Status' from the Operations menu; or
- You do not have your own record in the Info in Customer Status Report setting in the CRM module.
The [New Activity] text link will always be visible in the Supplier Status report.
- Open any record in a record window and select 'Workflow Activity' from the Create menu (Windows/Mac OS X) or + menu (iOS/Android). This will create an Activity relevant to the record you are working with, which you must have saved at least once. The Task Type of the new Activity will be To Do, and the Symbol will be Other. The Start Date and Start Time in the new Activity will vary, depending on the register from which it was created. Also depending on the register from which it was created, the Activity Type will be taken from the Activity Types, Subsystems setting or will be blank. The new Activity will be opened in a window entitled 'Activity: Inspect'. This means that it has been saved and is been opened for checking. After amendment if necessary, save the record by clicking the [Save] button or tapping √. Alternatively, if you no longer require the Activity, select 'Delete' from the Record menu (which has a 'cog' icon if you are using iOS or Android).
The Activity and the originating record will be connected to each other through the Link Manager and Workflow Manager. This allows you to open the originating record quickly and easily when reviewing the Activity (from the Link Manager in the Activity), or to open the Activity from the originating record (from the Workflow Manager in that record).
- When working with Contracts, Customer Letters, Invoices, Mails and Purchase Invoices, you can have Activities created automatically when you mark records as OK and save them. This is controlled by the Activity Types, Subsystems setting. Such Activities will be created and saved, but will not be opened automatically for checking or modification. Again, the Activity and the originating record will remain connected to each other through the Link Manager and Workflow Manager.
You can also have Activities created automatically from Sales and Purchase Orders when you save them for the first time. This is controlled by the Order Classes and Purchase Order Classes settings and by the Activity Types, Subsystems setting. Such Activities will be created and saved, but will not be opened automatically for checking or modification.
- From the browse windows listing Sales Orders, Service Orders and Contracts, you can highlight several records and select 'Activity' from the Create menu or + menu. Separate Activities will be created for each highlighted record. If you are using iOS or Android, you can only highlight a single record at a time, by searching for it, so you can only create an Activity from a single record at a time. The new Activities will be created and saved, but will not be opened automatically for checking or modification. The Activity Type of these new Activities will be taken from the Activity Types, Subsystems setting (in the case of Sales Orders, the Activity Type in the Order Classes setting will be given priority). The Activity and the originating record will be connected to each other through the Link Manager and Workflow Manager.
- You can have a new Activity created automatically from an old one when you enter a Result and save it. This depends on the Activity Type/Result combination and is controlled by the Activity Consequences setting. Such Activities will be created and saved, but will not be opened automatically for checking or modification. The old and new Activities will remain connected to each other through the Workflow Manager facility.
- If you call a Contact from the 'Communication Centre' window, a new Activity window will be opened when the call is answered, allowing you to record the details of the conversation immediately. When the call ends, click the [End Activity] button in the Activity: this will bring an End Time and Cost (Time) in to the Activity and will also save the Activity.
Similarly, if one of your Contacts calls you using Skype or SIP and your Standard ERP database is open, a new Activity window will be opened when you answer the call, again allowing you to record the details of the conversation. The Task Type of these Activities will be To Do, the Calendar Type will be Don't Show and the Symbol will be Call.
Whichever method you use, when the Activity window opens, enter the details of the event as necessary. In the case of future appointments, you will easily be able to return to the record to review it and mark it as completed at the appropriate time.
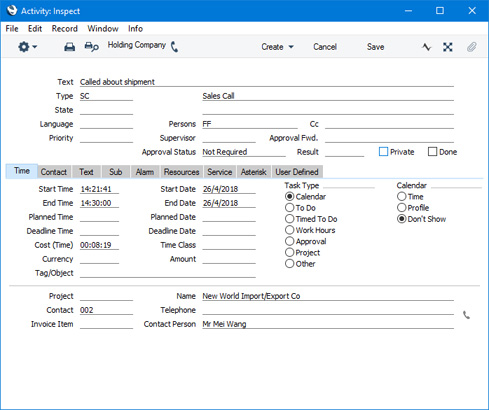
Since the amount of information stored about each Activity will not fit on a single screen, the Activity window has been divided into nine cards. At the top of each is the header. This contains the Text and Type and an indication of whether the Activity has been approved (completed). There are nine named buttons ('tabs') in the header.

By clicking the tabs you can navigate between the cards, and always go directly to a certain card. The header is always visible, so you can always identify the Activity you are working with.
If you are using iOS or Android, there will only be two tabs, marked 'Items' and 'Details'. If you tap 'Details', you will see every card except 'Text' arranged vertically on screen. You can scroll down to see each one, or you can jump to any card by tapping on any tab and selecting the tab you want to go to.
If you are using Mac OS X, there will be three additional tabs at the top of the window:

Again, click the tabs to navigate between the cards.
---
Activities and Tasks in Standard ERP:
Go back to: