Create Menu - Reservation - Invoice
This page describes the 'Invoice' function on the
Create menu in the Reservation record window. If you are using iOS or Android, the 'Invoice' function is on the + menu.
---
You can create an Invoice from a Reservation using the following methods:
- Open the Reservation in a record window and select 'Invoice' from the Create menu (Windows/macOS) or + menu (iOS/Android). Save any changes you have made to the Reservation before selecting the function. This method is described on this page.
- If the Reservation is part of a Group (i.e. if it is a Sub Reservation), you can create an overall Invoice from the Group Reservation for the main Guest Account (i.e. for the Customer in the Group Reservation). You can do this in two ways:
- Open the Group Reservation in a record window and select 'Invoice' from the Create or + menu.
- Run the 'Create Invoice from Group Reservation' Maintenance function and specify the Group Reservation Number in the specification window.
Guest Accounts from each Sub Reservation that are in the name of the Customer from the Group Reservation will all be included in the same Invoice. If you do not want a Sub Reservation to be included in this Invoice and instead you need it to be invoiced separately, select the Pay Separately option on the 'Other' card in the Sub Reservation. You will only be able to create Invoices for the Sub Reservation from the Sub Reservation itself (i.e. using the method in the first bullet point above).
If other Guest Accounts need to be invoiced, you will need to create those Invoices from the individual Reservations, again using the method in the first bullet point above.
Please refer here for more details about creating Invoices from Group Reservations.
- To create an Invoice for a particular Guest Account especially in the situation where that Guest Account has been used in more than one Reservation, use the 'Create Group Invoice from Reservations' Maintenance function. This will create an Invoice in which the Items (e.g. Room charges, Package Items, Repetitive Items and/or any other Items) that have been assigned to the Guest Account in each Reservation will be gathered together.
Before being able to create an Invoice from a Reservation using any of these methods, you must add the
Room charge, the
Package Items and the
Repetitive Items to the Reservation Guest Account(s). You can do this using the following methods:
- Open the Reservation in a record window and select 'Charge Stay' or 'Charge Until Check Out Date' as necessary from the Operations or Tools menu. 'Charge Stay' will add charges up to the current date to the Guest Account(s) (up to the current date and time if the Room is being charged hourly), while 'Charge Until Check Out Date' will add all charges up to the Check Out Date to the Guest Account(s), even if the Check Out Date is in the future.
- You can also run the 'Charge Stay' and 'Charge Until Check Out Date' functions from a Group Reservation, to add charges to the Guest Accounts in all the Reservations in a Group.
- If you need to run the 'Charge Stay' function for all Reservations in a batch, run the 'Nightly Maintenance' Maintenance function with the Charge Stay option selected.
If you need to check before invoicing that all charges have been added to the Guest Account(s) in a Reservation, press the [Show Account] button in the
header of the Reservation. A report will be printed to screen listing the contents of each Guest Account. If Items have been added to the wrong Guest Account, you can move them using the
'Redistribute Folio Items' function on the Operations or Tools menu.
The behaviour of the 'Invoice' function will depend on how many Guest Accounts there are in the Reservation, as follows:
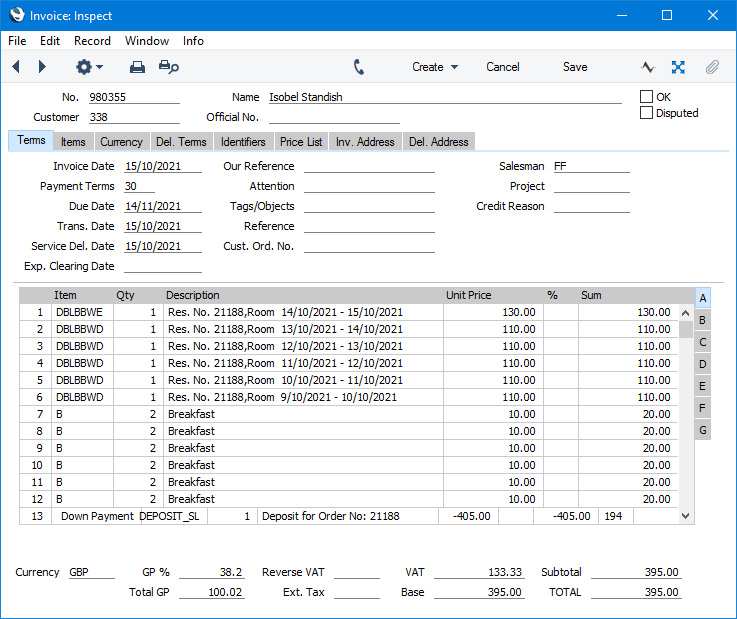
- If there is only one Guest Account, an Invoice will be created immediately and opened in a window entitled 'Invoice: Inspect'. This means that it has already been saved and is being opened for checking. A Reservation contains a single Guest Account if:
- A single Guest is listed on the 'Guest' card and this Guest is also specified as the Customer.
- A single Guest is listed on the 'Guest' card and the Customer field is empty.
- No Guests are listed on the 'Guest' card and the Customer field is not empty.
- If there is only one Guest Account but an Agent has been specified in the Reservation, click or tap in the Agent field before selecting the function if you need to invoice the Agent. Again an Invoice will be created immediately and opened in a window entitled 'Invoice: Inspect'.
- If there is more than one Guest Account, the window illustrated below will open. Use this window to specify the Guest Account that is to be invoiced (or that all Guest Accounts are to be invoiced):
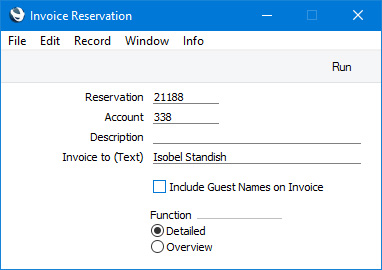
- Reservation
- This field provides a reminder of the Reservation Number.
- Account
- Paste Special
Customer, Agent, Guests and any additional Guest Accounts in the Reservation
- Specify the Guest Account that is to be invoiced.
- If this field is empty, every Guest Account (except empty Guest Accounts) in the Reservation will be invoiced.
- Note that specifying a Guest Account does not mean the entire Reservation will be invoiced to that Account but instead that an Invoice will be created for the Items on the specified Account. The [Show Account] button in the Reservation will show the Items that will be included in the Invoice.
- Invoice to (Text)
- The Name of the Guest Account (i.e. from the relevant Contact record) will be copied here when you specify the Account in the field above. You can change this Name if you need a particular name to appear in the Invoice(s).
- Include Guest Names on Invoice
- Select this option if you need the Guests to be listed on the Invoice.
- Function
- Choose an option to specify how many rows the Invoice should have, as follows:
- Detailed
- This option will assign each daily Room charge and each Item to its own row in the Invoice. For example, if a Guest stays for three nights and takes a newspaper and breakfast each day, the Invoice will contain three rows for the Room charge for each night, three rows for the individual newspapers and three rows for the individual breakfasts.
- Overview
- This option will add a single row to the Invoice for each Item. Continuing the previous example, the Invoice will contain a single row for the Room charges, a single row for the newspapers and a single row for the breakfasts. The Qty in each row will be 3.
When you press the [Run] button, the appropriate number of Invoices will be created, but they will not be opened for checking or printing. You can find and open the Invoices using the following methods:
- The Invoices will be attached to the Reservation and will be visible in the Link Manager. Open the Link Manager and open the Invoices from there.
- The Show Account report will be updated to show that the Guest Account(s) have been invoiced. Open the Show Account report by pressing the [Show Account] button in the Reservation and open the Invoices by clicking or tapping the Invoice Numbers.
The Invoice will be constructed using the following options in the Hotel Settings setting:
- Invoice Currency ('Terms' card)
- If you specify an Invoice Currency, all Hotel Invoices will be in that Currency. Otherwise, they will be in the Currency used in the Reservation.
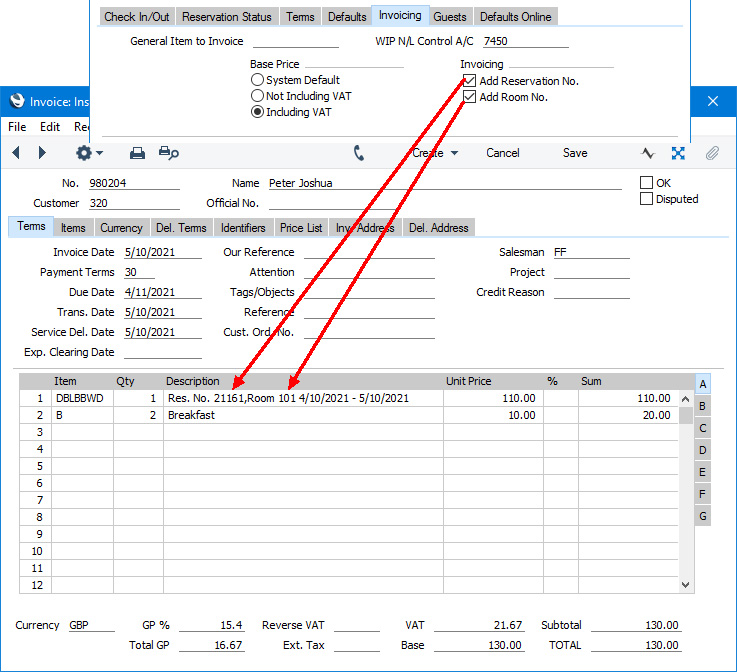
- Add Reservation No., Add Room No. ('Invoicing' card)
- When a Room charge is included in an Invoice, the description in the Invoice row will include the period covered by the Room charge. If you have selected these options, it will include the Reservation Number and/or the Room Number as well.
To print an Invoice, click the Printer icon (Windows/macOS) or select 'Print' from the File menu (all platforms). If you have not yet marked the Invoice as OK and if you are not using the
No Test Printout option in the
Optional Features setting in the System module, the printed Invoice will be marked as a test print, so that you cannot confuse it with the final version of the Invoice.
When the Invoice is complete, tick the OK check box and save. This signifies that the Invoice has been approved. Associated transactions in the Nominal Ledger (including cost of sales postings if you are using this option) will be created if you have so determined using the Sub Systems setting in the Nominal Ledger and in the Number Series - Invoices setting. You will no longer be able to modify the Invoice.
Please refer here for a full description of the Invoice window, including detailed information about marking Invoices as OK, printing them and generating Nominal Ledger Transactions.
As already mentioned, the Reservation and the Invoice(s) will be connected to each other through the Link Manager facility. This allows you to open the Reservation quickly and easily when reviewing one of the Invoices, or to open the Invoices from the Reservation.
You can use Access Groups to prevent certain users from creating Invoices from Reservations. To do this, deny them access to the 'Invoice from Hotel Reservation' Action.
If you need to reverse a Hotel Invoice, follow the standard crediting procedure. Open the Hotel Invoice and select 'Credit Note' from the Create menu, then mark the resulting Credit Note as OK and save. Using the 'Credit Note' function will ensure that Guest Account will be updated with the value of the Credit Note. If you have Cancellation Terms in effect, the 'Credit Note' function will calculate a reduced value for the Credit Note depending on when you create it (i.e. on how many days it is before the Check In Date). Please refer to the description of the Cancellation Terms setting here for details.
---
The Reservation register in Standard ERP:
Go back to: