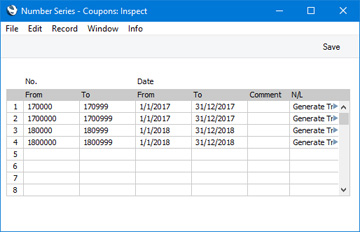
Language:


Point of Sales - Preparing for Live-Sync Connections

After carrying out the steps listed on the Preparing the Main Database page, you will be ready to prepare each till and cash machine for live-sync connection. Tills that will use a live connection should not be prepared as described here: instead, refer to the Preparing a Till for Live Connection page

Many of the settings controlling the operation and appearance of the Point of Sales module are found in the User Settings module. Most of the settings and registers in this module are stored locally in the databases on each till, allowing various tills to behave in different ways.

Storing information locally usually means that you will need to configure each till separately. However, it may be inconvenient to work on each till separately, if there are many of them and if they do not have conventional keyboards. To get around these problems, you can log in to the server from a desktop client and create separate records for each till in the Local Settings and Login Shortcuts settings in the Technics module (steps 1 and 2 below). When a till logs in for the first time, the relevant records from those settings will be sent to the till automatically.

To begin with, log in to the server from a desktop client as a system administrator (i.e. as a Person belonging to an Access Group that explicitly grants full access to the Technics module) and follow the steps described below:

  1. Local Settings (Local Machine setting) In the Local Settings setting in the Technics module, enter separate records for each live-sync till. Use these records to configure the Local Machine setting for each till. Please refer here for details.

  2. Login Shortcuts Similarly, in the Login Shortcuts setting also in the Technics module, enter separate records for each live-sync till. Use these records to configure the Login Shortcuts register for each till. Please refer here for details.

  3. Synchronised Number Series When POS Invoices are created on live-sync tills, they should be given Invoice Numbers from different Number Series, to ensure each Invoice Number is unique. Otherwise, if the server goes offline, there is a risk that the same Invoice Number could be used by more than one till as in this situation the Invoice Numbers will be generated by the tills themselves. To avoid this problem, you should use the Synchronised Number Series setting in the Technics module to define separate Number Series for each live-sync till: please refer here for full details. As well as Number Series for POS Invoices, you should also use the Synchronised Number Series setting to define Number Series for Cash Events, Credit Card Slips, Deferred CC Transactions, Gift Receipts, Gift Vouchers Issued and Received and POS Sessions for each till.

  4. Number Series for Live Tills If you have live-sync tills and therefore have filled in the Synchronised Number Series setting as described in the previous step, you should also fill in the standard Number Series settings for the same registers (POS Invoices, Cash Events, Credit Card Slips, Gift Receipts, Gift Vouchers Received and POS Sessions). This will ensure that records (e.g. POS Invoices) created on live tills will not have Numbers that will clash with records created on live-sync tills.

  5. Legal Record Numbers If you are in a country where an Official Serial Number should be assigned to each POS Invoice, you will need to define separate number sequences for each live-sync till. This will ensure that each Official Serial Number can only be used once. Use the Legal Record Numbers setting in the Sales Ledger to define these number sequences, specifying a Local Machine in each row to make the sequences specific to each till. Depending on your location, you may need to define separate sequences for POS Invoices and Credit POS Invoices.

  6. Synchronisation Options Open the Synchronisation Options setting in the Technics module, select the Activate option and specify how often the server should check the Tills for updated information. If you will be using the Item Pictures in POS Invoices option, tick the Sync Item Images option as well. Please refer to the Live-Sync Details page for more details.

  7. Optional Features Open the Optional Features setting in the System module and select the Export Sequence numbers option. This option is necessary for synchronisation to operate. Please refer to the Live-Sync Details page for more details.
After carrying out the previous steps, you will now be ready to create the databases for the tills. Carry out the configuration work itemised below separately on each till. If your tills do not have keyboards, you may need to create and test databases for each one on a desktop client and then copy those databases (i.e. the "HANSA.HDB" files) to the tills over the network.
  1. Create a new live-sync till database Ensure there is no "HANSA.HDB" file in the folder containing the Standard ERP client application, and launch the application. When the 'Welcome to Standard ERP' window appears, click or tap the [Synchronize with Server] button. A 'Server Address' window will appear: this is the normal 'Server Address' window, with the addition of a Local Machine field:

    Enter the IP address of the server, the port and, if you are using it, the Encryption Key, all as normal. Then, enter the Local Machine Code that you want to assign to the till in the Local Machine field. Finally, click or tap the [Connect] button.

  2. Choose a Company and then log in in the usual way. The server and the till will be synchronised: everything needed for the till to act as a sales terminal when the server is offline will be sent from the server to the new database on the till. This includes the Local Machine and Login Shortcuts settings on the till, which will be updated as described in steps 1 and 2 above. The Local Machine Code that you specified in the previous step will also be copied to the Local Machine setting on the till i.e. it will become the Local Machine Code of the till.

  3. After connecting a till to the server for the first time over a live-sync connection, it is recommended that you quit, restart and log in again. The first synchronisation will copy details such as Login Shortcuts and Access Groups to the client, but they may not be implemented in full immediately after being copied until you restart.

  4. Connecting Drawers to the Till Connect a Drawer to the till by entering an opening POS Session record, quoting the till's Local Machine Code (from steps 8 and 9) and the relevant Drawer. Please refer here for more details about POS Sessions.

    If you are not using the Allow Multiple Sessions per Machine option in the POS Settings setting (i.e. if each till has a single Drawer), opening a session will connect and lock the Drawer to the till. As a result, each POS Invoice that you enter on the till will be assigned to the correct Drawer. If you do not open a session, POS Invoices entered on the till will not be assigned to a Drawer and so will not be included in the cash up routines.

    If you are using the Allow Multiple Sessions per Machine option, you will need to open separate sessions for each Drawer. This will lock the Drawers to the till and also to members of staff. As a result, each POS Invoice that is entered on the till will be assigned to the correct Drawer for the member of staff currently logged in.

  5. Log-in Options The Login Options setting is not synchronised. If you need buttons and/or a keypad to appear in the 'Login' window on a particular till, select the relevant options in the Login Options setting in the User Settings module.

  6. Tab Item Groups The Tab Item Group register is also not synchronised. If you need a Tag/Object to be assigned to every POS Invoice entered on a till, create a record in the Tab Item Group register in the User Settings module and specify the Tag/Object there.
---

Preparing for Point of Sales:

Go back to: